Pine Pitch Salve: The Forgotten Remedy Your Grandparents Swore By
Your grandparents didn’t run to the pharmacy every time someone got a splinter or a nasty cut. They walked outside, found the nearest pine tree, and collected something far more effective than most of what lines drugstore shelves today. That sticky, golden resin oozing from damaged bark wasn’t just tree sap, it was their first-aid kit, their infection fighter, their secret weapon against wounds that refused to heal.
Seventy years ago, making pine pitch salve was as common as baking bread. Families kept jars of it in their medicine cabinets, applied it to everything from stubborn splinters to inflamed joints, and passed the recipe down through generations. Then somewhere along the way, we forgot. We traded this powerful natural remedy for tubes of petroleum-based products with ingredients we can’t pronounce.
But here’s what makes this especially relevant right now: pine trees grow nearly everywhere in North America. The knowledge to transform their protective resin into a medicinal salve takes less than two hours to master. And the results? They rival anything you’ll find in a modern first-aid kit without the chemicals, without the cost, and without depending on a supply chain that might not always be there.
Why Pine Pitch Works: The Science Behind Nature’s Antiseptic
When a pine tree gets damaged (whether from a broken branch, insect attack, or disease) it doesn’t just sit there vulnerable to infection. It immediately secretes a thick, sticky resin that serves three critical purposes: it seals the wound, it kills invading bacteria and fungi, and it actively draws out foreign contaminants.
The tree’s pitch contains powerful compounds called terpenes that give it antimicrobial and antifungal properties. These same compounds make pine pitch naturally antiseptic and anti-inflammatory. When you apply pine pitch salve to your skin, you’re harnessing the exact same protective mechanism the tree uses to defend itself.
What makes pine pitch particularly effective as a drawing salve is its extractive quality. Just as it pulls invasive insects and pathogens deeper into its sticky matrix on the tree, it pulls splinters, infections, and inflammation out from beneath your skin. Many who’ve used pine pitch salve report stubborn splinters that resisted tweezers for days simply working their way to the surface overnight when treated with this remedy.
The resin also acts as a natural barrier, sealing wounds while still allowing the skin to breathe, preventing moisture loss, and keeping bacteria from entering. This dual action of protection and active healing explains why cuts treated with pine pitch salve often heal faster and with less scarring than those treated with conventional products.
Pine pitch salve represents the kind of practical medical knowledge our grandparents relied on when doctors weren’t available and it’s far from the only one. While modern medicine has given us remarkable advances, there’s immense value in knowing how to manage common health situations with what you have on hand. If you’re serious about medical self-reliance, The Home Doctor: Practical Medicine for Every Household compiles the ingenious methods doctors in Venezuela developed when hospitals ran out of medicine and supplies practical techniques you can use when help isn’t on the way.
The Historical Legacy: More Than Just Folk Medicine

Pine pitch salve isn’t some obscure folk remedy known only to a handful of herbalists. It has a documented history spanning thousands of years across multiple continents. Native American tribes used pine resin extensively for wound care, respiratory issues, and joint pain. They understood that different pine species offered slightly different properties but all shared that core healing power.
European settlers quickly adopted these practices, finding that pine pitch salve worked exceptionally well in frontier conditions where doctors were scarce and infections could prove fatal. The Civil War saw widespread use of pine tar and pitch-based remedies for treating battlefield wounds when proper medical supplies ran short.
What’s remarkable is that modern research has validated what our ancestors knew instinctively. Studies on Norway Spruce and various pine species have confirmed their antimicrobial effectiveness, their ability to promote tissue regeneration, and their anti-inflammatory properties. Science has simply caught up with traditional wisdom.
By the 1930s and 1940s, making pine pitch salve was standard homestead knowledge. Mothers taught daughters the exact ratio of pitch to oil, the proper temperature for melting, and which trees produced the best resin. This wasn’t alternative medicine, it was the medicine! proven through generations of effective use.
Pine pitch salve was just one of many powerful herbal preparations families kept on hand, others like Four Thieves Vinegar, the legendary immunity booster from the Black Death era, were equally valued for their protective properties.
Identifying and Harvesting Pine Pitch: What You Need to Know
Before you can make the salve, you need to collect the raw material. The good news? Pine pitch is remarkably easy to find if you know what to look for. The even better news? You don’t need to wound any trees to harvest it.
What to Look For:
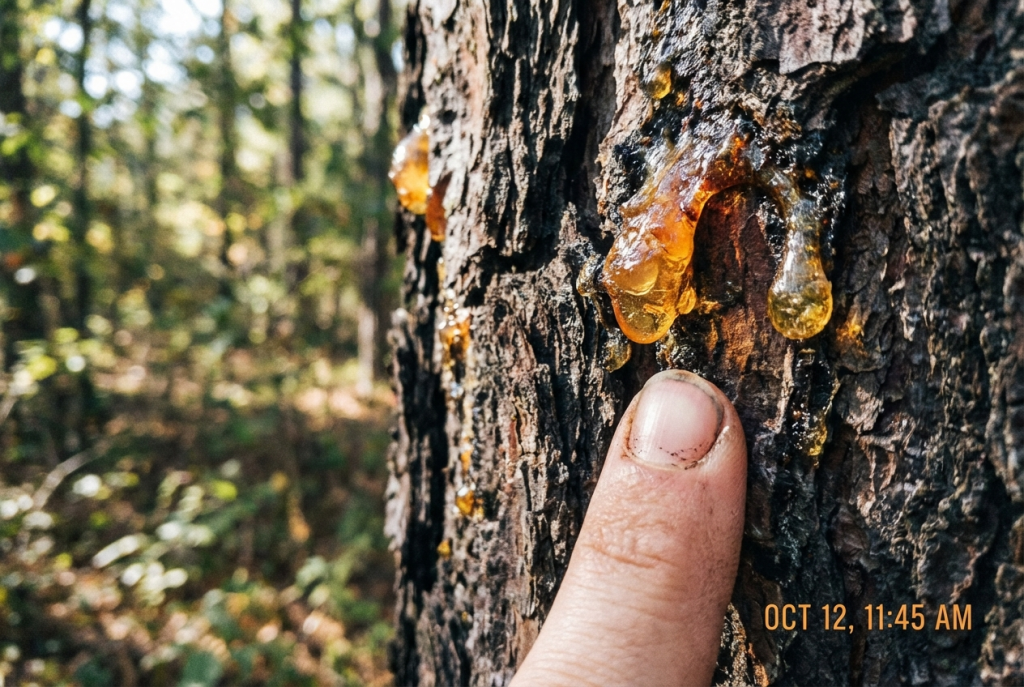
Pine trees naturally produce resin whenever they’re damaged. Look for areas where branches have broken off, where bark has been scraped or torn, or where woodpeckers have drilled holes. The resin appears as amber-colored, sticky deposits around these wounds. Sometimes it’s soft and gooey (especially in warm weather), sometimes it’s hardened into solid chunks (particularly older deposits).
Fresh pitch tends to be lighter in color (golden or pale amber) and quite sticky. Aged resin darkens to a deep amber or brownish color and hardens considerably. Both work for making salve, though fresh pitch melts more quickly while aged resin takes longer but often produces a salve with deeper color and richer scent.
Best Pine Species:
While most pine trees produce usable resin, some work better than others:
- White Pine produces abundant, high-quality resin with excellent medicinal properties and a pleasant scent
- Pitch Pine lives up to its name with copious resin production
- Ponderosa Pine offers good resin with strong antimicrobial properties
- Eastern White Pine provides mild, effective resin perfect for sensitive skin
- Spruce trees (technically not pines but close relatives) also produce excellent medicinal resin
Avoid Norfolk Island Pine and Yew trees, which contain compounds that can be toxic.
Ethical Harvesting Practices:
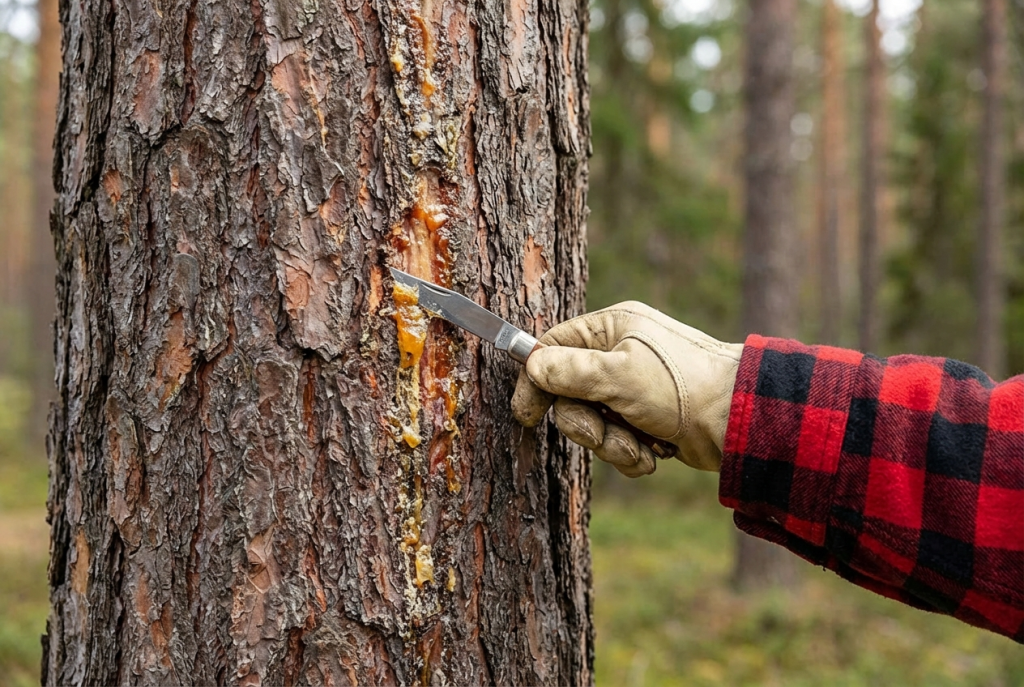
This is crucial: never wound a tree just to collect pitch. The resin is performing a vital healing function for the tree. Only harvest from below the original wound site, where excess resin has dripped down the trunk and is no longer protecting the tree’s vulnerable interior. This ensures the tree continues its own healing process while you gather what it can spare.
Use a knife or scraper to gently pry the hardened pitch away from the bark. For softer pitch, you might need to use a stick or old utensil, it will stick to everything. Keep a small container of olive oil handy for cleaning your hands afterward, as soap and water alone won’t remove pine resin.
When to Harvest:
Pine pitch can be collected year-round, but each season offers different characteristics:
- Spring: Resin flows more freely as temperatures warm, making it softer and stickier
- Summer: Peak production time with abundant fresh pitch available
- Fall: Good time to collect hardened resin from summer injuries
- Winter: Resin is harder and easier to handle, though less abundant
Aim to collect at least one cup of raw pitch for a decent batch of salve. Don’t worry about bits of bark, needles, or even the occasional insect, you’ll strain all of that out during the melting process.
Making Pine Pitch Salve: Step-by-Step Instructions
Now comes the transformation from sticky tree resin to smooth, medicinal salve. This process requires patience and attention but nothing complicated. If you can follow a basic recipe, you can make pine pitch salve.
What You’ll Need:
- 1 cup collected pine pitch (loosely packed)
- 1 cup high-quality olive oil (or other carrier oil)
- 2-4 tablespoons beeswax (depending on desired firmness)
- Double boiler setup (never heat pine pitch directly over flame—it’s highly flammable)
- Fine mesh strainer, cheesecloth, or coffee filter
- Small glass jars or tins for storage
- Stirring utensil you don’t mind dedicating to this purpose
Optional additions:
- 10-15 drops essential oils (tea tree for extra antimicrobial power, lavender for scent and healing)
- Infused oils (plantain, comfrey, or calendula for enhanced skin healing)
The Process:
Step 1: Set Up Your Double Boiler
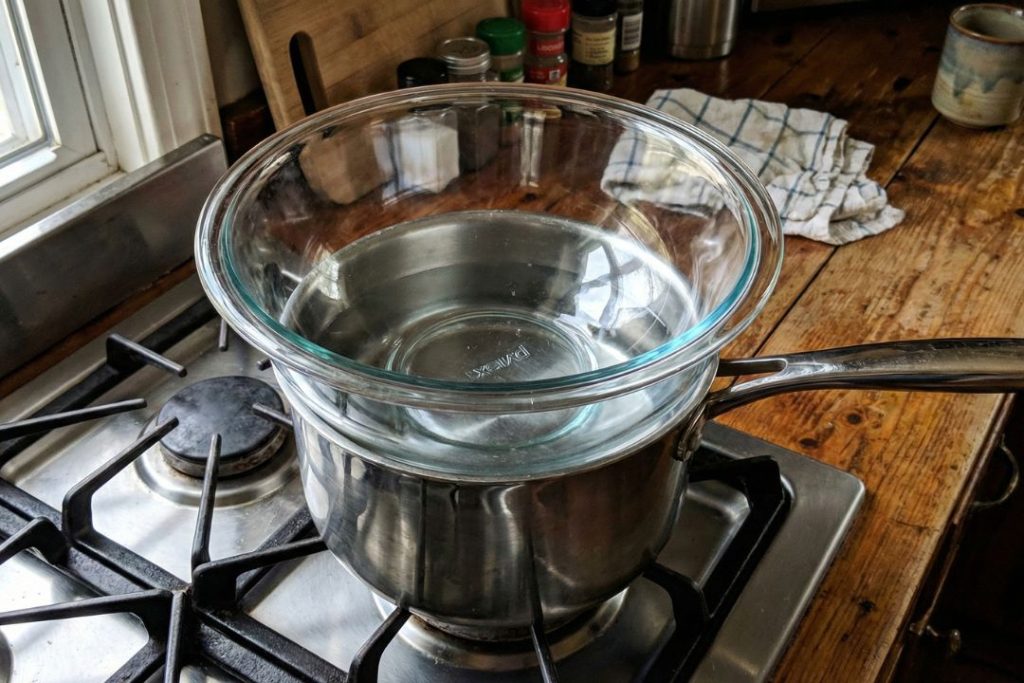
Fill a pot with a few inches of water and place a heat-safe glass bowl or jar on top, ensuring the bottom doesn’t touch the water. This indirect heating method is essential because pine resin is extremely flammable. Never, under any circumstances, heat it directly over a burner.
Step 2: Render the Pine Pitch
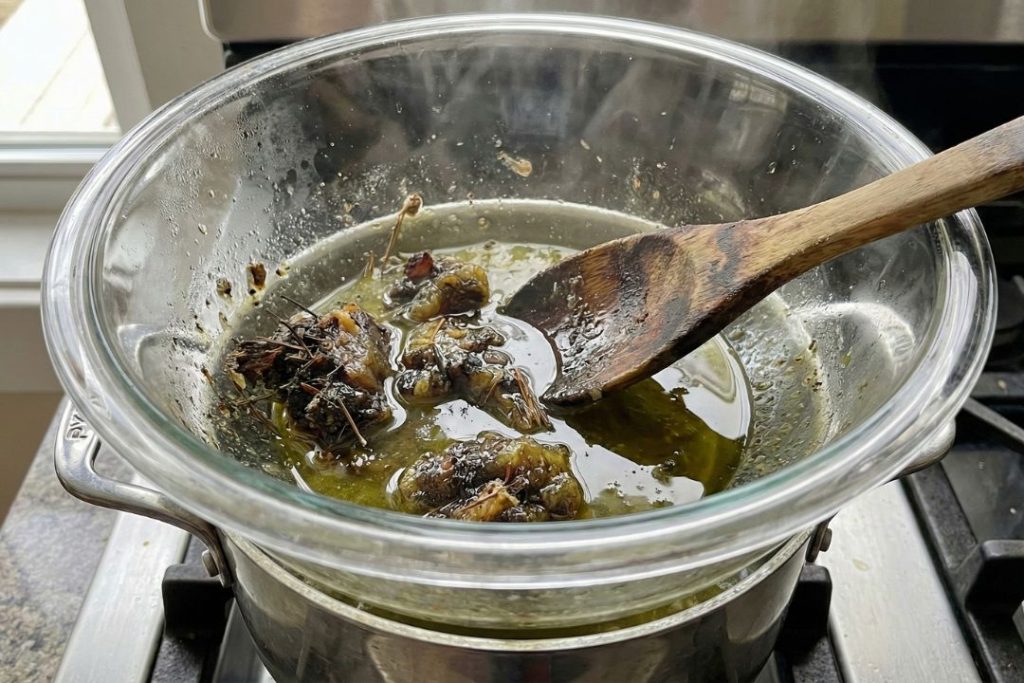
Place your collected pitch in the glass container and add the olive oil. The 1:1 ratio is a good starting point, though you can adjust based on how much pitch you have. Turn the heat to low and let the pitch slowly melt into the oil.
This takes time, anywhere from 30 minutes to several hours depending on how hard your resin is. Stir occasionally. You’ll see the pitch gradually dissolve into the oil, turning it a beautiful golden-amber color. Debris, bark, and insect parts will settle to the bottom or float to the top.
Step 3: Strain the Mixture
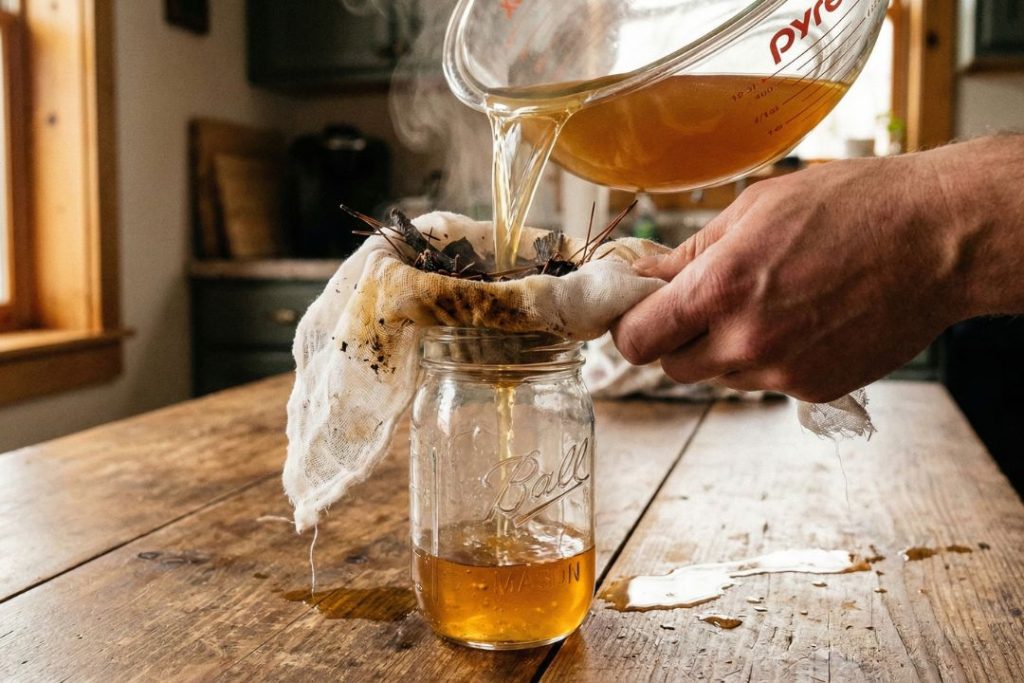
Once the pitch has completely melted and incorporated into the oil, carefully strain the mixture through your chosen filter. This removes all the unwanted bits while keeping the medicinal oleoresin. Work while it’s still warm—if it cools too much, it will start to solidify and become difficult to strain.
Pour the strained mixture into a clean jar or back into your double boiler bowl.
Step 4: Add the Beeswax
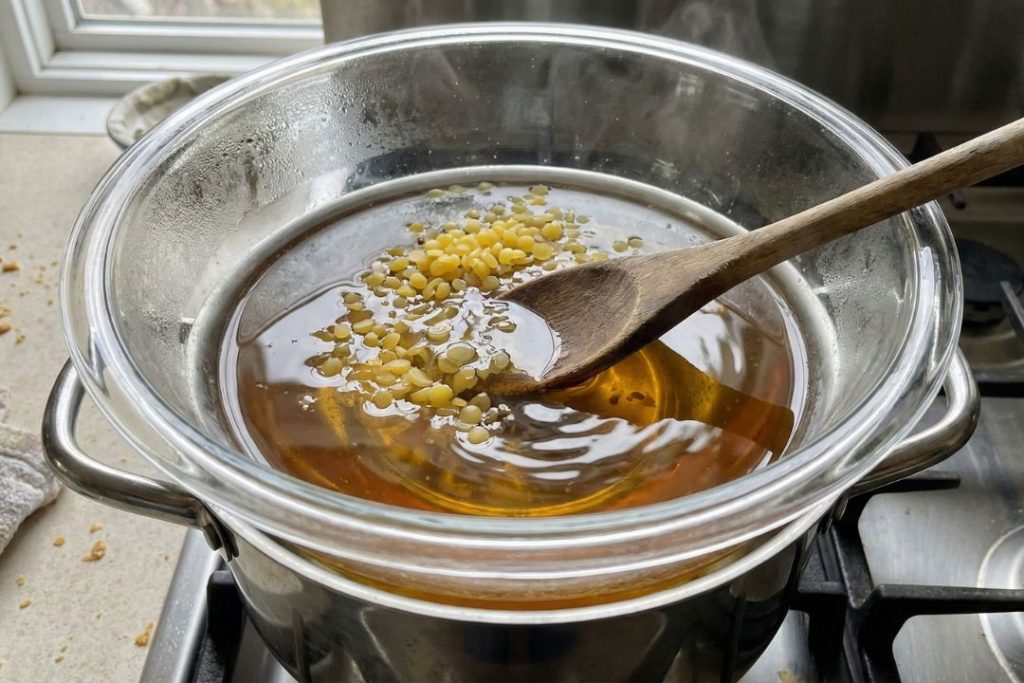
Return the strained pine oil to your double boiler (if you removed it) and add the beeswax. Start with 2 tablespoons for a softer salve, up to 4 tablespoons for a firmer consistency. The beeswax is what transforms your liquid oil into a solid salve.
Stir until the beeswax melts completely and blends evenly with the pine oil. This usually takes 5-10 minutes.
Step 5: Test the Consistency
Before pouring into jars, test your salve consistency. Place a small spoonful on a cool plate and let it sit for a minute. If it’s too soft, add more beeswax. If it’s too hard, add a bit more oil. Remember that the salve will be firmer at room temperature than when warm.
Step 6: Add Optional Ingredients and Pour
If you’re using essential oils or other additions, stir them in now that the mixture is off the heat. Essential oils lose their potency when heated, so always add them last.
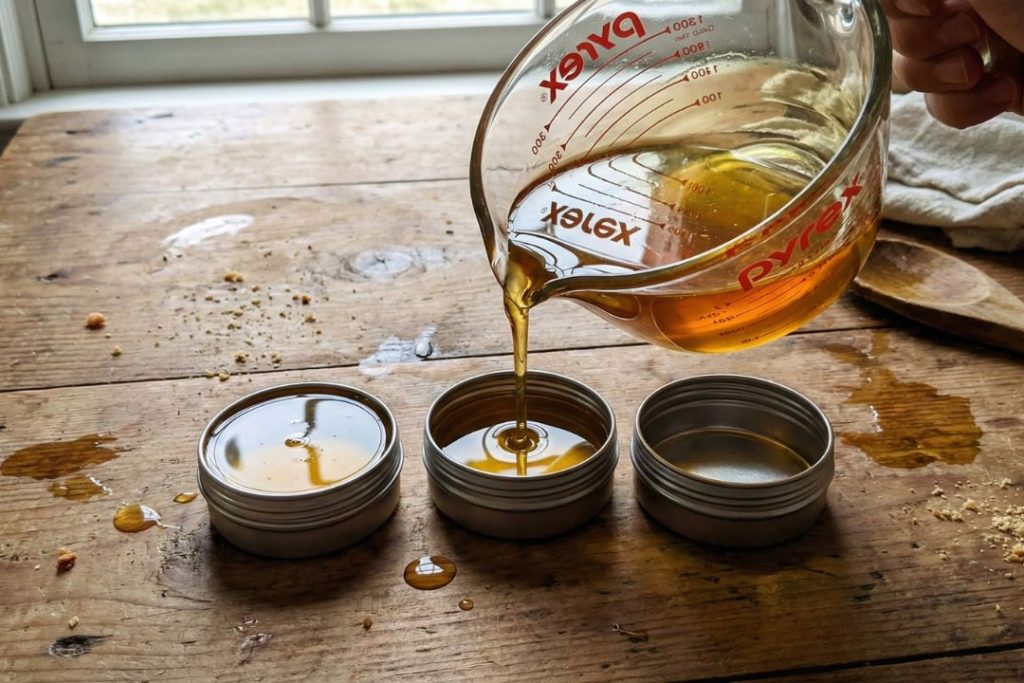
Carefully pour the salve into clean, dry jars or tins. Work quickly but carefully, the mixture will start to set as it cools. Fill containers to just below the rim, leaving a small gap at the top.
Step 7: Cool and Label
Let your salve cool completely undisturbed. This takes several hours. Don’t move or jostle the containers while they’re setting, or you might create air pockets or uneven texture.
Once cooled, label each container with the contents and date. Include any special ingredients you added (like essential oils) so you know what you’re using later.
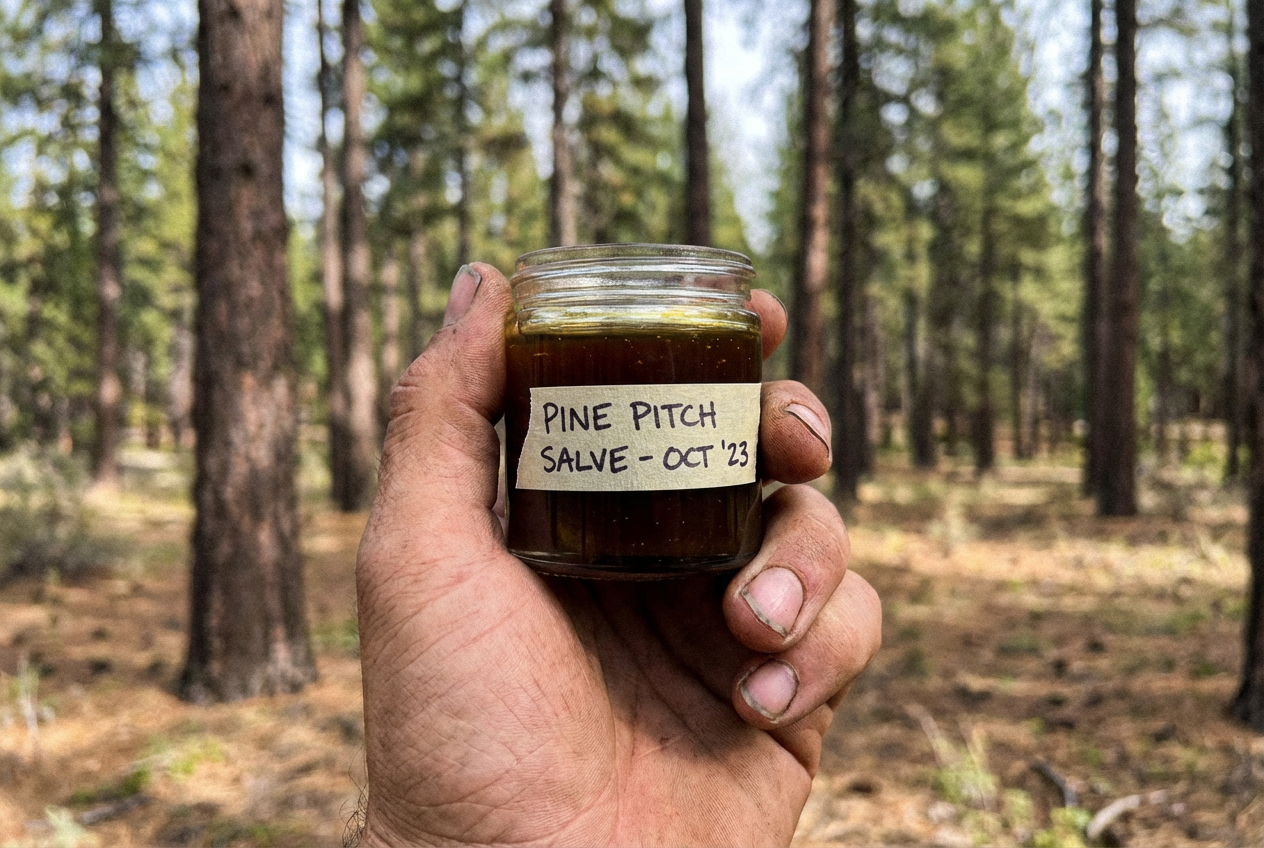
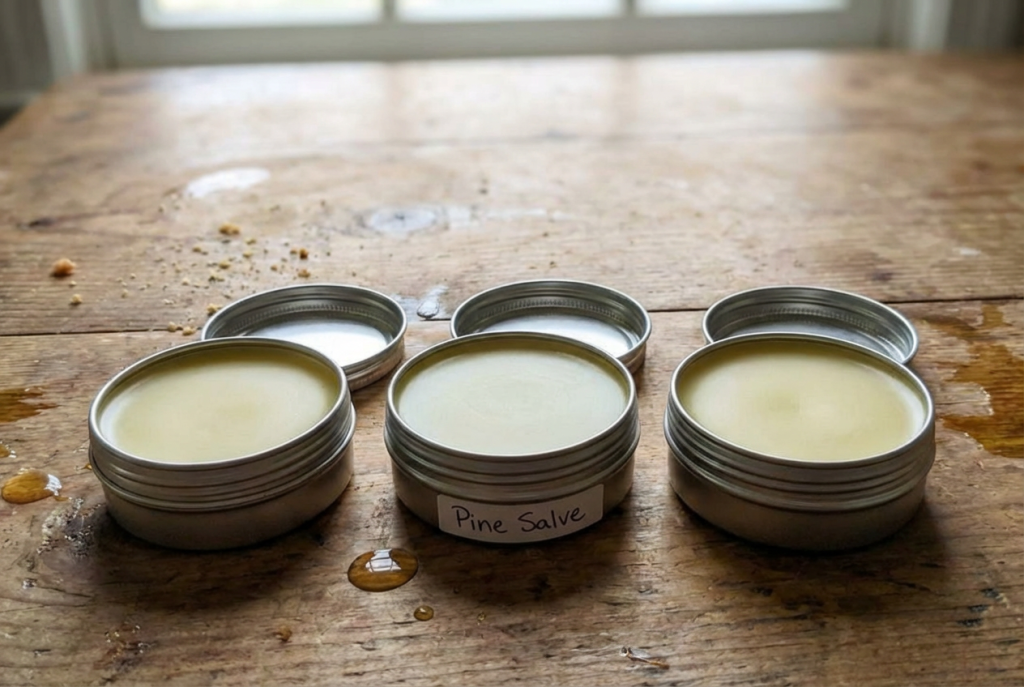
Yield: This recipe typically produces 10-12 ounces of finished salve, enough to fill 3-4 small tins with some left over for personal use.
Storage: Properly made pine pitch salve lasts for years when stored in a cool, dark place. The natural preservative properties of pine resin, olive oil, and beeswax mean it won’t go rancid quickly. That said, use your senses—if it ever smells off or shows mold (extremely rare), discard it.
How to Use Pine Pitch Salve: Practical Applications
Your finished salve is remarkably versatile. Here’s how to put it to work:
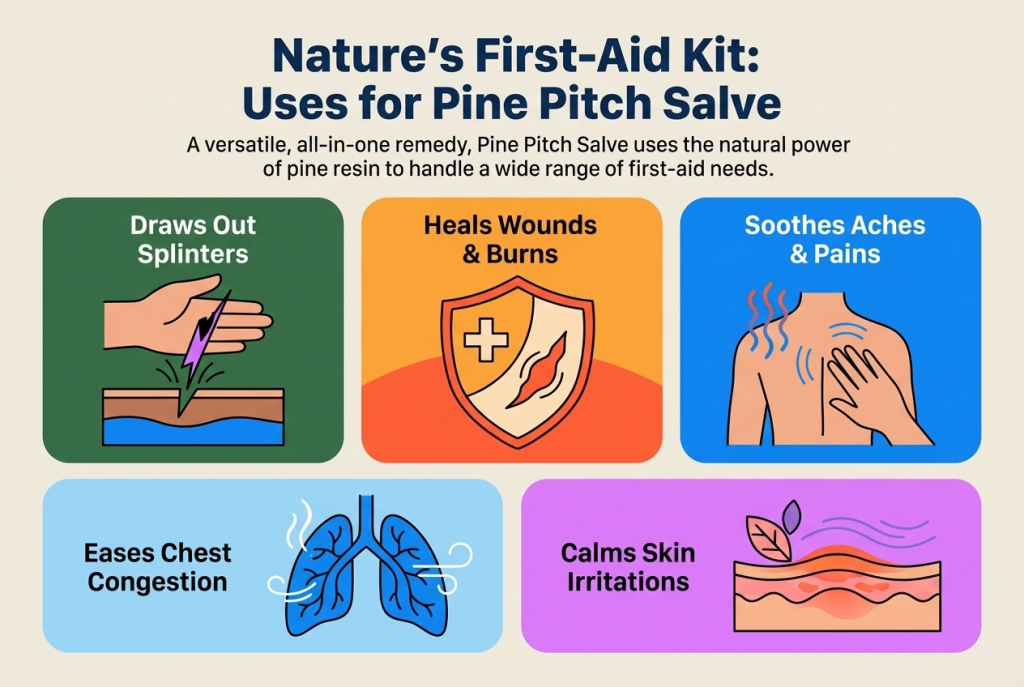
For Splinters and Embedded Foreign Objects:
Apply a generous amount directly over the splinter or embedded object. Cover with a bandage and leave overnight. The drawing properties of the pine pitch will pull the splinter toward the surface, often completely extracting it by morning. For stubborn deep splinters, reapply daily until removed.
For Cuts, Scrapes, and Minor Wounds:
Clean the wound thoroughly first. Apply a thin layer of salve directly to the affected area. The antimicrobial properties help prevent infection while the resin creates a protective barrier that still allows the wound to breathe. Reapply 2-3 times daily until healed. Pine pitch salve works exceptionally well for wound care, but it’s not the only natural remedy at your disposal. Plantain leaf is another powerful drawing agent that grows as a common ‘weed’ in most yards and our grandparents knew it as ‘nature’s band-aid’ for its ability to treat cuts, stings, and infections. Learning multiple remedies gives you options when one isn’t readily available.
For Joint Pain and Sore Muscles:
The warming, stimulating properties of pine resin make it excellent for painful joints and sore muscles. Massage a generous amount into the affected area. The salve increases circulation and reduces inflammation. Many find it particularly helpful for arthritic joints, lower back pain, and muscle soreness after hard physical work.
For Chest Congestion:
Rub the salve on the chest and upper back as you would any commercial vapor rub. The volatile terpenes in pine resin help clear respiratory passages and ease breathing. The aroma alone provides relief, while the compounds penetrate to reduce inflammation in bronchial passages. For internal respiratory support, combine this external treatment with mullein tea, the pioneer remedy for coughs and lung infections, together they provide comprehensive respiratory relief.
For Eczema and Skin Irritations:
Pine pitch salve can be surprisingly effective for persistent skin conditions. The anti-inflammatory properties soothe irritation while the antimicrobial action addresses any underlying bacterial component. Apply a thin layer to affected areas twice daily.
For Chapped Skin and Minor Burns:
The protective, moisturizing qualities make pine pitch salve excellent for weathered, chapped skin. It also provides relief for minor burns by sealing moisture in and bacteria out.
Emergency Field Use:
In the wilderness without your prepared salve? You can apply pine pitch directly from the tree to a wound in an emergency. Clean the wound as best you can, pack it with fresh pine pitch, and wrap it. The pitch will seal and protect the wound until you can get proper treatment.
Application Tips:
- The salve may feel slightly sticky going on but absorbs within minutes
- A little goes a long way, start with a small amount and add more if needed
- For very hard salve, warm it between your palms before applying
- Always apply to clean, dry skin for best results
- Keep a small tin in your first-aid kit, car, and tool shed
Having pine pitch salve in your medical kit is a solid start, but it’s just one tool. True medical preparedness means knowing how to handle everything from recognizing heart attack symptoms to managing wounds when professional help isn’t available. That’s why serious preppers also study resources like The Home Doctor, which teaches the practical medical techniques developed by doctors working without modern supplies knowledge that could save a life when you’re on your own.
Beyond the Basics: Advanced Considerations and Variations
Once you’ve mastered the basic recipe, you can experiment with variations that enhance specific properties:
Enhanced Drawing Salve:
Add activated charcoal powder (1 tablespoon per cup of finished salve) and plantain-infused oil instead of plain olive oil. This combination creates an exceptionally powerful drawing salve for infections, boils, and deeply embedded splinters.
Extra-Strength Antimicrobial Version:
Substitute part of your olive oil with oils infused with additional antimicrobial herbs like thyme, oregano, or bee balm. Add tea tree and eucalyptus essential oils for even stronger antimicrobial action.
Joint and Muscle Therapy Blend:
Infuse your carrier oil with comfrey, arnica, and St. John’s wort before combining with pine pitch. Add a few drops of wintergreen, peppermint, or camphor essential oil for enhanced pain relief.
Gentle Skin Healing Formula:
For sensitive skin or children, use calendula and plantain-infused oil as your carrier. Keep the pine pitch ratio lower (3/4 cup pitch to 1 cup oil) and add lavender essential oil. This creates a milder salve that’s still effective but less intense.
All-Season Variations:
Adjust beeswax content based on climate. In hot summer weather, use more beeswax for a firmer salve that won’t melt in your pack or first-aid kit. In winter, use less beeswax for a softer consistency that’s easier to apply in cold conditions.
Troubleshooting Common Issues
Salve Too Soft: Remelt in your double boiler and add more beeswax, a little at a time, testing consistency until you reach desired firmness.
Salve Too Hard: Remelt and add more carrier oil to soften.
Won’t Solidify: Usually means insufficient beeswax or the mixture wasn’t fully blended. Remelt, add beeswax, stir thoroughly, and retest.
Grainy Texture: This happens when beeswax crystallizes during cooling. Remelt slowly and let cool undisturbed at room temperature (not in the refrigerator).
Rancid Smell: Extremely rare with pine pitch salve, but if it happens, the carrier oil likely went bad. Always use fresh, high-quality oils and store salve properly.
Skin Irritation: Very uncommon, but some people may be sensitive to pine resin. Test on a small area first. If irritation occurs, try a formula with lower pine pitch concentration or discontinue use.
Beyond Pine Pitch: The Medical Knowledge You Need
Making pine pitch salve proves something important: you’re capable of creating effective medicine with your own hands. No pharmacy required, no prescription needed just knowledge and the willingness to use it.
But what happens when the situation goes beyond splinters and scrapes? When someone in your family shows signs of a heart attack, or a wound becomes infected, or you need to manage a chronic condition without access to regular medical care?
That’s when knowing one remedy isn’t enough. That’s when you need the kind of comprehensive medical knowledge that can handle serious situations, the knowledge our grandparents had, and that doctors in crisis zones have had to relearn.

The Home Doctor: Practical Medicine for Every Household is exactly that resource. Written by Dr. Maybell Nieves, who pioneered medical techniques when Venezuelan hospitals lost power, medicine, and supplies, it shows you how to manage most health situations when help isn’t coming. You’ll learn:
- How to recognize a heart attack or stroke immediately and what to do before an ambulance arrives
- Which four antibiotics you should stockpile (legally, without prescription) and when to use them
- What to do with medications that require refrigeration during a blackout
- How to treat wounds, infections, and common ailments with limited supplies
- The truth about expired medications, which are safe to use and which aren’t
This isn’t theoretical knowledge from someone’s research. These are battle-tested methods developed by real doctors managing real emergencies in conditions we hope never to face but should be prepared for anyway.
Pine pitch salve handles cuts, splinters, and sore joints beautifully. But combine it with the knowledge in The Home Doctor, and you’ve built something much more powerful: true medical self-reliance for you and your family.
Your Path Forward
Pine pitch salve proves you’re capable of more than you think. You can take a sticky resin from a tree and transform it into medicine that works. You don’t need a pharmacy, a prescription, or anyone’s permission.
That same capability extends to dozens of other skills and remedies. The question isn’t whether you can learn them, you’ve already proven you can. The question is whether you’ll invest the time now, while it’s easy and resources are available, or wait until circumstances force your hand.
Start this week: Make your first batch of pine pitch salve. Experience that moment when you realize you’ve created something genuinely useful with your own hands.
Then decide: Is this enough, or do you want to keep building your knowledge and capabilities? Do you want to be the person your family turns to in a crisis, knowing you have the skills and knowledge to help?
The resources are there. The knowledge is preserved. All that’s missing is your decision to act.
Have you made pine pitch salve or other traditional remedies? Share your experiences in the comments below, your success might inspire someone else to take that first step toward self-reliance.
I want to know more remedies