How to Make Lye Soap From Wood Ash and Animal Fat: The Lost Art That Could Save You Hundreds
Your great-grandparents possessed a skill that could transform two seemingly worthless materials into one of the most essential items for survival. They could take a pile of fireplace ashes and leftover cooking fat and create soap that cleaned, disinfected, and preserved. No trip to the store. No chemicals. No dependency.
This wasn’t just thrift, it was pure self-reliance. Today, we’ve outsourced this basic necessity to corporations charging premium prices. But what happens when supply chains break down or you need to stretch every dollar? The answer sits in your wood stove right now.
How Ashes Become Soap
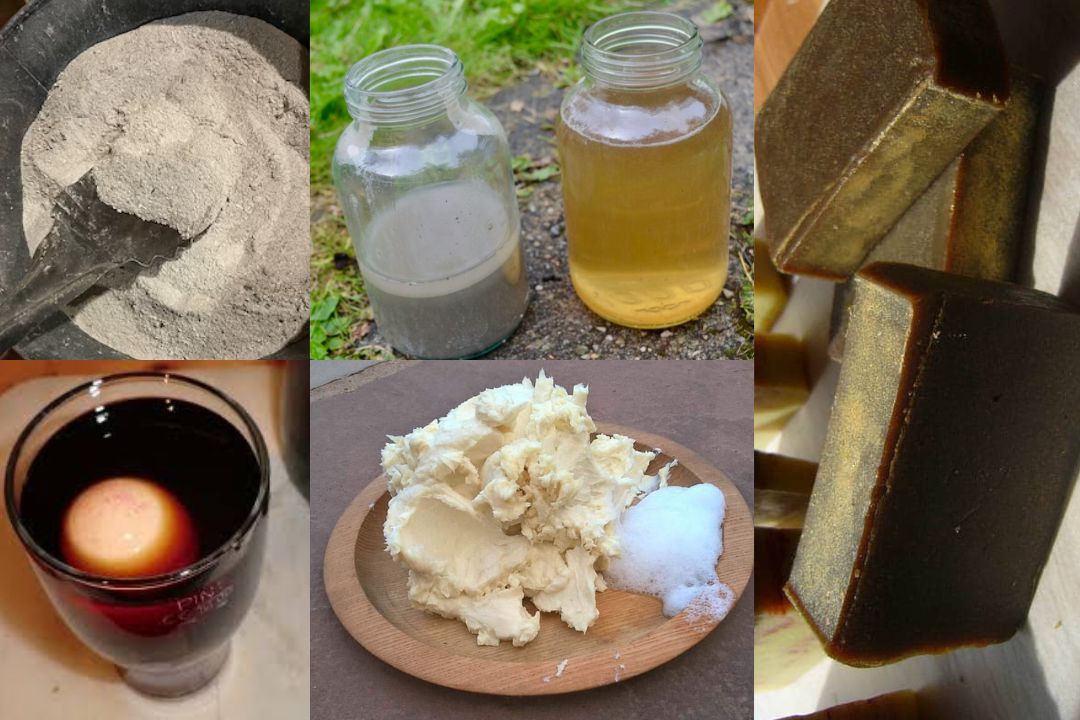
When water meets wood ash, the potassium carbonate dissolves, creating lye a powerful alkaline solution. Mix this lye water with any animal fat, and you witness saponification: the chemical process that bonds alkali with fatty acids to form soap molecules.
Our ancestors understood this intimately. They knew which woods burned hottest, which fats made the best soap, and how to test their lye by floating an egg in it. If that egg bobbed with roughly a quarter-sized area visible above the waterline, the lye was perfect.
Why This Matters Now
Financial Independence: A single batch costs pennies compared to $4-8 per bar at the store. Your ashes are free waste product. Your fat? Saved from cooking or rendered from wild game.
Chemical-Free: No synthetic fragrances, parabens, or mysterious ingredients. Just two components that have cleaned effectively for millennia.
Preparedness: In a crisis, maintaining hygiene prevents disease. Knowing how to make soap means you’ll never run out.
Skill Sovereignty: Once mastered, you possess knowledge that transcends money. You can barter, teach, and ensure your family’s needs are always met.
Soap is just one piece of crisis preparedness. Having a year’s supply of survival foods that require no refrigeration ensures you’re ready for extended emergencies where both hygiene and nutrition matter.
Gathering Your Materials
The beauty lies in simplicity. Everything required either comes from your homestead or costs almost nothing.
The Right Ashes
Hardwood ashes produce the strongest lye. Your best choices:
- Oak (the gold standard)
- Maple (especially sugar maple)
- Hickory (produces strong lye)
- Ash tree
- Beech
Avoid softwoods like pine and spruce. Their resin interferes with saponification. Burn wood completely until you have light gray to white ash, not charcoal chunks. Sift before use.

The Right Fats
Any animal fat works, but results vary:
Beef Tallow: Makes hard, long-lasting bars. Can smell earthy. Excellent for heavy-duty cleaning.
Pork Lard: Creates softer soap with milder scent. Lathers better. Ideal for hand and body washing.
Wild Game Fat: Deer, elk, bear whatever you harvest works perfectly. Render it clean.
Mixed Fats: Combine for balance. Try 70% tallow with 30% lard for all-purpose soap.
Render fat properly: cut into small chunks, heat slowly with a bit of water, strain through cheesecloth. You want clear, clean fat with no impurities.
Essential Equipment
- Large non-aluminum container (5-gallon bucket)
- Stainless steel pot
- Wooden stirring stick
- Molds (wooden boxes, silicone molds, cleaned cans)
- Safety gear: rubber gloves, goggles, long sleeves
- White vinegar (to neutralize lye contact)
- Soft water (rainwater or distilled)
Never use aluminum—lye will corrode it.
Making Your Lye Water: The Quick Method
Mix wood ash with soft water in a large pot aim for thin milkshake consistency. Use roughly 1 cup ash per quart of water. Stir thoroughly, then let sit for 3-4 hours.
Heavy particles settle while lye-rich water rises to the top. Carefully pour off the clear liquid, leaving sediment behind.
For stronger lye, simmer gently until reduced by half. Never boil rapidly, lye fumes are caustic.
Testing Your Lye Strength
The egg float test has been used for centuries:
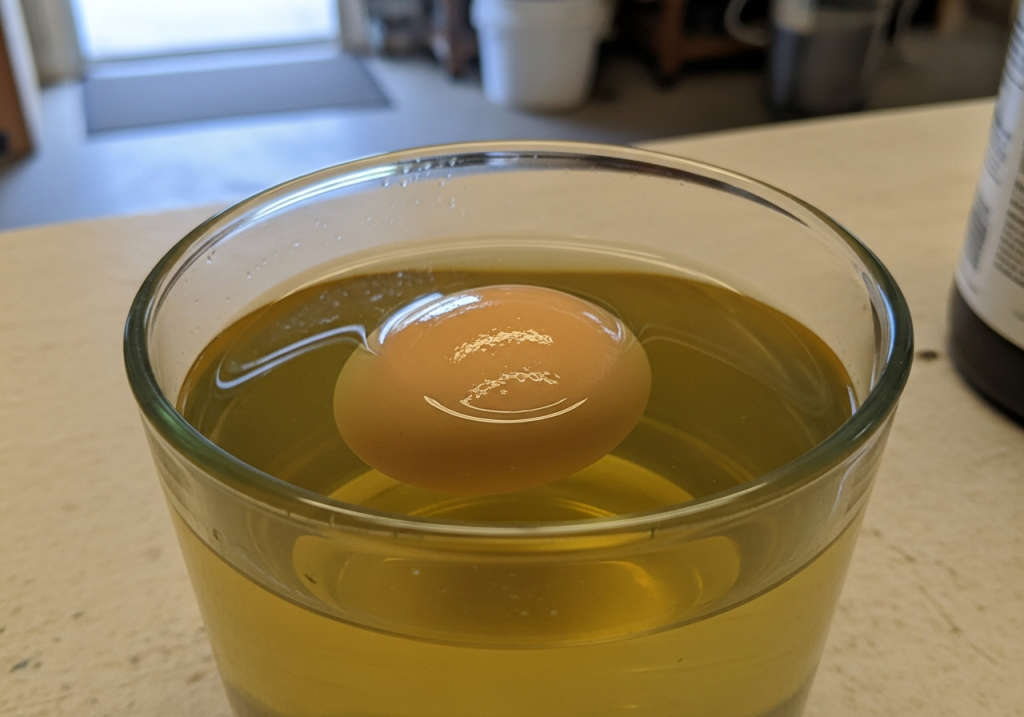
Gently lower a fresh egg into your lye water:
- Perfect strength: Egg floats with a quarter-sized area showing above surface
- Too weak: Egg sinks or barely floats. Boil lye down to concentrate it.
- Too strong: More than half the egg protrudes. Dilute with soft water.
Alternative: Dip a chicken feather in lye water. If it dissolves within 30 seconds, your lye has reached proper strength.
Safety note: Never use any egg that’s contacted lye for eating. Mark clearly and discard.
The Soap-Making Process
Temperature and Ratios
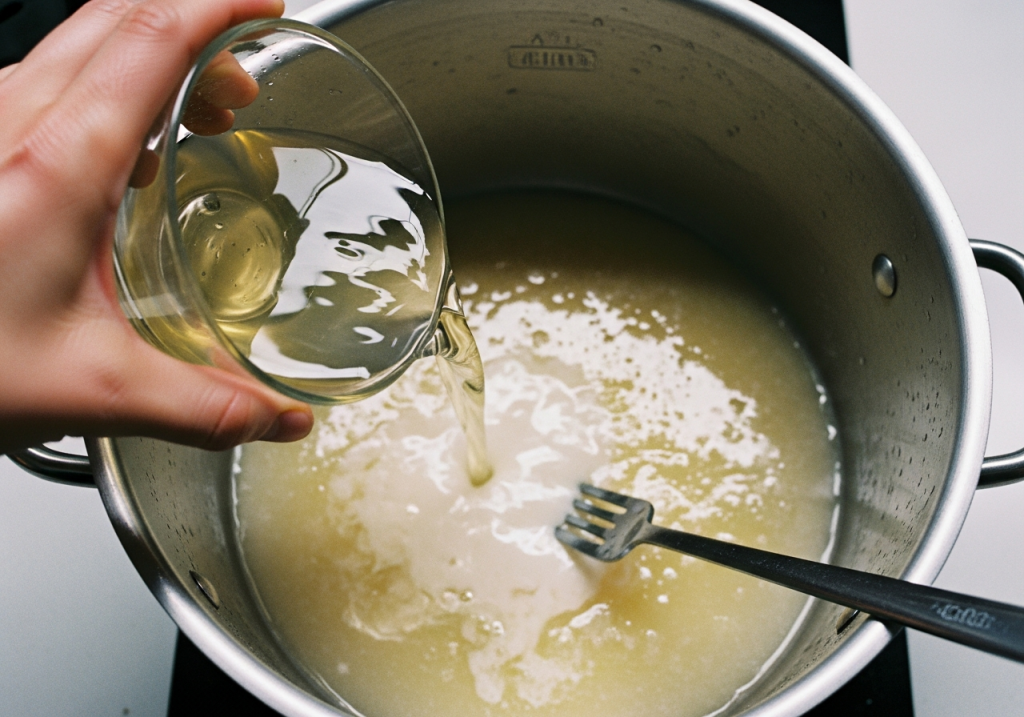
Both your lye water and melted fat should be 95-100°F when mixed. Use a thermometer.
Standard ratio: For every 1 cup of rendered fat, use approximately 3/8 cup of properly tested lye water.
Mixing Technique
- Heat rendered fat in stainless steel pot until completely melted and clear
- Remove from heat and cool to 95-100°F
- Slowly pour lye water into fat (never the reverse)
- Stir constantly in one direction for 20-45 minutes
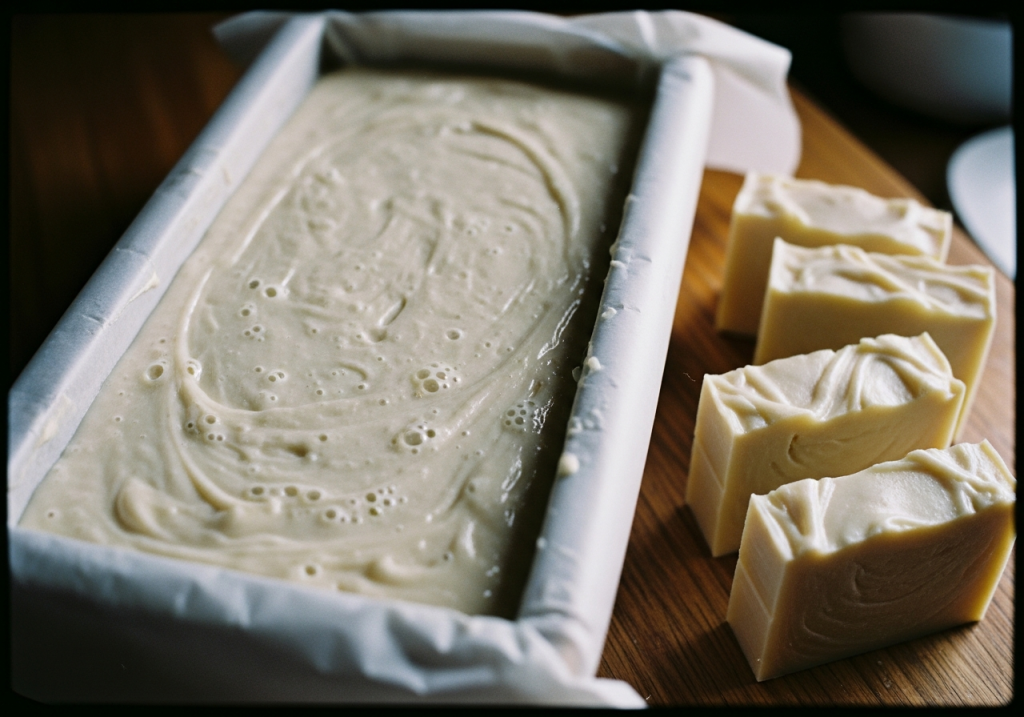
- Watch for “trace”—when mixture thickens like thin pudding and drizzled soap leaves temporary patterns
Molding and Curing
Pour traced soap into molds immediately. Cover with a towel and don’t disturb for 24-48 hours.
After 2-3 days, unmold and cut into bars. Now comes patience: cure for 4-6 weeks. This allows moisture to evaporate and saponification to complete. Turn bars every few days during curing.
Troubleshooting Common Issues
Soap stays liquid: Lye too weak. You’ve made liquid soap, excellent for dishes and laundry. Store in jars.
Soap separates: Temperatures too different or insufficient stirring. Reheat gently and stir to re-emulsify.
Soap is oily: Too much fat. Safe but inefficient. Use for gentle hand washing.
Soap burns skin: Too much lye or needs more curing time. Let cure another 2-4 weeks.
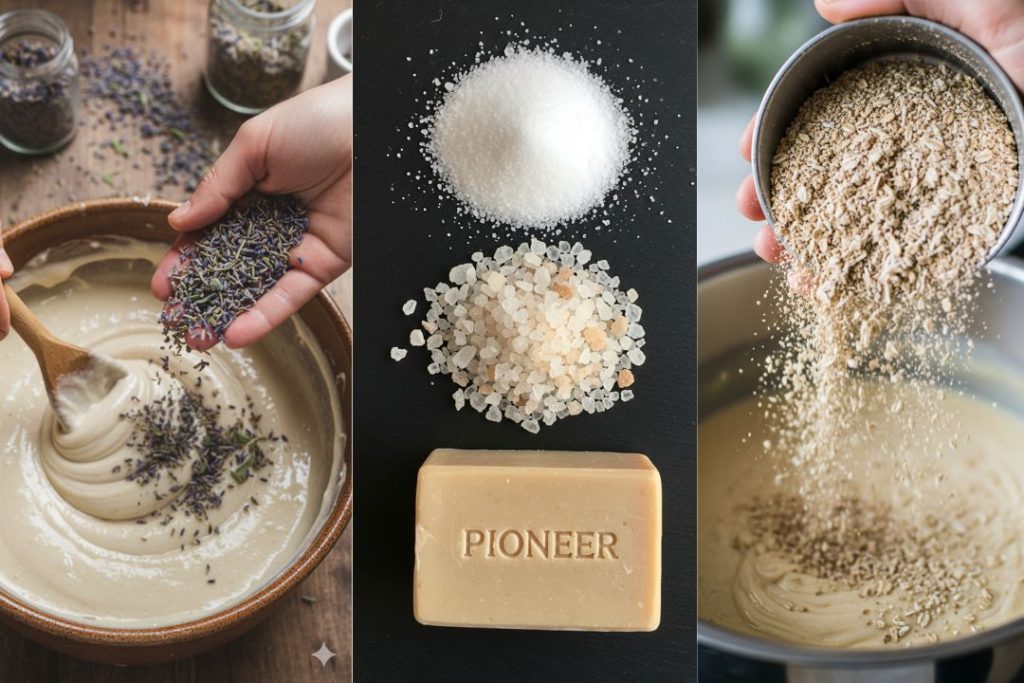
Pioneer tip: Add 1-2 tablespoons salt per quart after trace to harden soft soap significantly.
Customizing Your Soap: Pioneer Variations
Once you master the basic recipe, homesteaders discovered countless ways to adapt soap for specific needs. These variations transformed simple soap into specialized tools.
Adding Herbs for Purpose
Lavender or Chamomile: Dried flowers added at trace create gentle,23 skin-soothing soap. Crush herbs finely before adding about 2 tablespoons per pound of soap. Perfect for hand and body washing.
Pine Needles or Sage: These antibacterial herbs make powerful cleaning soap. Pioneers used this version for washing wounds and sanitizing surfaces. Steep herbs in your lye water before mixing for stronger infusion.
Mint or Rosemary: Natural deodorizing properties. Excellent for kitchen soap or washing hunting clothes. The oils help cut grease while leaving a fresh scent.
Plantain or Comfrey: Known for healing properties. Homesteaders made special batches for washing irritated skin or minor scrapes.
Salt Variations for Hardness
Different salt additions create different results:
Table Salt (1-2 tbsp per quart): Hardens soft wood ash soap into firmer bars. The sodium partially converts potassium soap to sodium soap.
Sea Salt (2-3 tbsp per quart): Contains trace minerals that create harder, longer-lasting bars with slight exfoliating properties.
Epsom Salt (1 tbsp per quart): Adds magnesium, creating soap that’s gentler on skin while maintaining hardness.
Texture Additions
Oatmeal (finely ground): Add 1/4 cup per pound at trace. Creates gentle exfoliating soap perfect for scrubbing hands after garden work. Also soothes irritated skin.
Sand or Pumice: For heavy-duty mechanics soap. Pioneers added fine sand to create scrubbing soap for removing pitch, tar, and stubborn grime. Use 2-3 tablespoons per pound.
Cornmeal: Mild abrasive that’s gentler than sand. Good for kitchen soap and general cleaning without scratching surfaces.
Beeswax: Melt 1-2 tablespoons into your fat before adding lye. Creates harder, more water-resistant bars that last longer.
Scenting Without Essential Oils
Modern essential oils weren’t available to pioneers, but they found creative solutions:
Pine Resin: Small amounts (1 tsp per pound) added to melted fat create naturally scented soap with antibacterial properties.
Dried Citrus Peel: Grated lemon or orange peel added at trace provides light, fresh scent and helps cut grease.
Wood Smoke: Soap made with hickory ash naturally carries a subtle smoky scent that many find pleasant.
Honey: One tablespoon per pound creates a sweet-scented soap that’s naturally moisturizing. Add at trace and stir thoroughly.
Specialty Soap Recipes Homesteaders Used
Laundry Soap: Use 100% tallow for hardest possible bars. Add washing soda (2 tbsp per pound) at trace. Grate when cured for powerful laundry detergent.
Dish Soap: Higher lye concentration creates stronger cleaning action. Keep this soap liquid and store in jars near your sink.
Shaving Soap: Use 50% tallow, 50% lard. Add 1 tablespoon glycerin (rendered from soap-making process) for extra lubrication. Creates excellent lather.
Garden Pest Soap: Pure soap without additives. Dilute heavily for spraying plants—herbs or scents can sometimes harm beneficial insects.
Seasonal Variations
Summer Soap: Add mint or citrus peel for cooling, refreshing properties. Make bars slightly softer for easier lathering in cold creek water.
Winter Soap: Add extra beeswax or tallow for harder bars. Include healing herbs like comfrey for dry, chapped skin common in cold weather.
Hunting Season Soap: Unscented, made with pure rendered fat. Hunters washed with this to avoid carrying foreign scents into the woods.
Making Liquid Soap Intentionally
If you prefer liquid soap, deliberately make it:
- Use half the lye concentration (weaker lye water)
- Skip the salt addition entirely
- Add extra water at trace
- Store in jars or bottles
This creates excellent dish soap, hand soap for washstands, or laundry soap. Many homesteaders preferred liquid soap for certain tasks.
Critical Safety Practices
Lye burns. Wood ash lye is gentler than commercial sodium hydroxide but still caustic.
Always:
- Wear rubber gloves and safety goggles
- Work in well-ventilated areas
- Keep white vinegar immediately accessible (neutralizes lye on skin)
- Label everything clearly
- Keep children and pets away
- Never taste, touch barehanded, or ingest
If lye contacts skin: flood with vinegar, then rinse thoroughly with water.
While soap-making accidents are rare with proper precautions, knowing how to treat burns and chemical exposure without access to modern medicine is invaluable homesteading knowledge. This practical medical guide covers emergency treatment for common homestead injuries.
Expanding Your Skills
Making soap opens pathways to countless traditional skills. You learn about rendering, wood types, chemistry, preservation. Each skill connects to others, creating a web of self-reliance knowledge.
Consider what else our ancestors mastered: candle-making, meat preservation without electricity, identifying medicinal wild plants, natural dyes, root cellar building. The Lost Frontier Handbook compiles these techniques into one comprehensive resource, taking you far beyond soap-making into territory most survival guides never touch.
The authors spent years interviewing elderly farmers, researching historical documents, and field-testing forgotten methods. What they discovered could mean the difference between thriving and merely surviving.
Start Small, Learn Deep
Don’t wait for a crisis. Start now, while mistakes don’t matter and you can learn at your own pace.
Begin with a small batch, maybe 2 cups of fat. This limits risk while letting you experience the full process. Take detailed notes. Record your wood type, ash quantity, water amount, fat type, mixing time, and cure duration.
Don’t be discouraged by imperfect first attempts. Some batches will be too soft, too harsh, or oddly colored. These aren’t failures, they’re education. Each batch teaches you something invaluable.
Make soap regularly, perhaps once per season. This keeps the technique fresh and builds a stockpile that reduces store dependence. Teach others. Share this skill with family so others can maintain capability if you’re unavailable.
The Path Forward
Making soap from ashes and fat represents more than a homesteading hobby. It’s a declaration of independence from systems that increasingly seem fragile.
Every bar proves a point: you don’t need much to meet essential needs. You need knowledge, resources, and willingness to work. Begin today. Save your wood ashes. Start collecting cooking fat. These “waste products” become valuable once you understand their potential.
The journey toward self-sufficiency doesn’t happen overnight. It builds gradually, skill by skill, batch by batch. But each step forward makes you more capable of weathering whatever storms might come.
Your great-grandparents knew how to take care of themselves. That knowledge isn’t lost forever. It’s waiting for you to reclaim it, one ash pile and one pot of fat at a time.
The question isn’t whether you’ll need these skills. The question is whether you’ll learn them before you need them.
Start with soap. See where it leads.
What survival skills have you mastered? Share your experiences in the comments below. If you found this guide valuable, bookmark it and share it with others who value self-reliance. The more people who possess this knowledge, the more resilient our communities become.
Thank you for not just being another bait link. I actually read the whole thing and will be purchasing the book now because you shared someone it for nothing 😁
Thank you for not just being another bait link. I actually read the whole thing and will be purchasing the book now because you shared something for nothing 😁
love it
I would love to learn these skills.
Fantastic! Thank-you! These skills should be taught in schools.
I am sorry I can’t purchase your physical book in Canada.
amazing, will try
I am 77yo but my 5th grade teacher taught us to make soap in our science glass. I still remember the oak ash and the liquid dripping through gauze. the bars we made she let us use to wash our hands.